Saddlebag Lights (inside)
Page 1 of 2 12 LastLast
Results 1 to 10 of 12

Thread: Saddlebag Lights (inside)

  1. #1
    Senior Member 98valk's Avatar
    Join Date
    Jun 2013
    Location
    Albq, NM
    Posts
    790

    Saddlebag Lights (inside)

    Got my lights put in. It is real nice to be able to see what is in there, especially in the corners.

    The bags have a removable plastic cover at the top (8 screws). There is a nice recessed area for some leds. I put a plastic cover over them to keep from beating them up.

    You will need to wire +12 into the bags. The ground comes from the switches. I added a diode to make sure I didn't back the +12 into the ecu. I think there is already a diode, but wanted to be sure.

    I also added a "timer" to shut the lights off after a couple minutes. That's in case I don't shut the bags all the way and leave it too long.

    Here are some pics. Enjoy ....

    Attachment 3929

    Attachment 3930

    Attachment 3931

    Attachment 3932

    Attachment 3933

  2. #2
    Senior Member Westernbiker's Avatar
    Join Date
    Jun 2013
    Location
    Phoenix, Arizona
    Posts
    503

    NICE

    Nice job!

  3. #3
    Senior Member
    Join Date
    Dec 2013
    Location
    Belleville IL
    Posts
    268
    Nice!!!!
    I was just thinking of doing a project just like this timer and all.
    -Eric

  4. #4
    Member jlyon's Avatar
    Join Date
    Sep 2013
    Location
    Frederick, MD
    Posts
    82
    Looks good... could we see pix and wiring diagram with a parts list ??? Please !

  5. #5
    Senior Member 98valk's Avatar
    Join Date
    Jun 2013
    Location
    Albq, NM
    Posts
    790
    Quote Originally Posted by jlyon View Post
    Looks good... could we see pix and wiring diagram with a parts list ??? Please !
    Well, here is a start:

    First you need power to the bags. There is a rubber grommet on each that have some wires going through it. On the right back, you can remove one of the white plugs and push your wire through there. On the left side, I drilled a small hole through the rubber.

    Next, you will need to tap into the wire leaving the bag that switches to ground when the bags are open. On the right bag, the wire is white/red. On the left bag, the wire is blue/red. You should cut the wire and splice in a diode just to be safe and not send +12v back into the computer. The bar side of the diode should be pointing into the bag (the other side is attached to the wire leaving the bag). You need to attach the negative side of the LED's (or the timer) to the cathode (bar side) of the diode.

    Here is a schematic that will hopefully clear up some of this. And a parts list if you buy through Digikey. Radio Shack may or may not have these exact parts. Some can be fudged (close counts). The bigger the capacitor (22uf), the longer the lights will stay on before dimming off.

    The timer is not mandatory. Just ignore it and connect the LEDs right to the power and switched ground wires.

    Attachment 3939

    Attachment 3938

  6. #6
    Member jlyon's Avatar
    Join Date
    Sep 2013
    Location
    Frederick, MD
    Posts
    82
    THAT was an awesome response..

    Thank you ever so much....

    One more Winter mod coming up !!!


  7. #7
    DarkSider#1617 Steve 0080's Avatar
    Join Date
    Dec 2012
    Location
    Sanford,FLA
    Posts
    8,079
    Very nice !!!! Now I am jealous !!!!!!!
    " Truth is often deemed rude, blunt and to the point which is why so few make their friend " Freddy Hayler ..352-267-1553 Sanford, FLA Gutterman6000@Gmail.com

  8. #8
    Senior Member
    Join Date
    Dec 2013
    Location
    Land O Lakes, FL
    Posts
    135
    Very nice. Just an FYI EC makes a set of LED bag lights that plug right in to the harness and works off the factory door being open/closed. I did them on my last wing an they worked really nice.

  9. #9
    Senior Member
    Join Date
    Dec 2013
    Location
    Belleville IL
    Posts
    268
    Quote Originally Posted by 98valk View Post
    Well, here is a start:

    First you need power to the bags. There is a rubber grommet on each that have some wires going through it. On the right back, you can remove one of the white plugs and push your wire through there. On the left side, I drilled a small hole through the rubber.

    Next, you will need to tap into the wire leaving the bag that switches to ground when the bags are open. On the right bag, the wire is white/red. On the left bag, the wire is blue/red. You should cut the wire and splice in a diode just to be safe and not send +12v back into the computer. The bar side of the diode should be pointing into the bag (the other side is attached to the wire leaving the bag). You need to attach the negative side of the LED's (or the timer) to the cathode (bar side) of the diode.

    Here is a schematic that will hopefully clear up some of this. And a parts list if you buy through Digikey. Radio Shack may or may not have these exact parts. Some can be fudged (close counts). The bigger the capacitor (22uf), the longer the lights will stay on before dimming off.

    The timer is not mandatory. Just ignore it and connect the LEDs right to the power and switched ground wires.

    Attachment 3939

    Attachment 3938
    Thanks for the great write up on this.
    I may just do this over the weekend.
    -Eric

  10. #10
    Moderator / V-twin Gobbler GiddyupF6B's Avatar
    Join Date
    Jun 2013
    Posts
    692
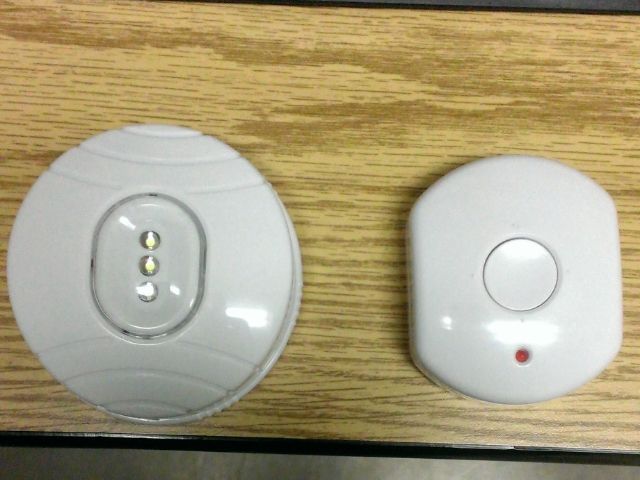
    Wow that's awesome!!!!! Nice work. I have 2- 3 light led pods that are affixed to the top inside of the saddle bag. They are remote controlled and the switch is in my glove box, I just hit the button and both bags light up nice and bright. If I was as talented as you are I would have wired some in but these art the next best thing. Here is the light and the remote. Inexpensive and super easy to mount. Plus it's pretty cool to hit the button in the cubby and the lights come right on.


Posting Permissions

  • You may not post new threads
  • You may not post replies
  • You may not post attachments
  • You may not edit your posts
  •