Raise that Honda Luggage Rack
Results 1 to 4 of 4

Thread: Raise that Honda Luggage Rack

  1. #1
    Senior Member 98valk's Avatar
    Join Date
    Jun 2013
    Location
    Albq, NM
    Posts
    790

    Raise that Honda Luggage Rack

    Hey All,
    I don't know about you, but to me, that luggage rack is too low/too tight. It is tough to attach bungies to the underneath hooks, and stuff on the luggage rack likes to touch the paint (which is a big no-no).

    Here is a pretty easy way to raise it a bit. First, use the rear bolts and spacers on the front of the rack. That raises it about .6". Believe it or not, that makes a nice difference. You can try that without going any further and see it you like it.

    Next, get two 8 x 1.25 x 70mm bolts/screws. I went with some low profile panheads from Ace. Now, you need either a 1.8" spacer, or if you use the front spacers in addition, you only need a 1.25" spacer for the rear. I am using a 1/4" pipe, painted black, and cut to size.

    Not only is the extra room much more useful, but I think it actually looks better, too (less crowded). Of course, I am biased - all my ideas are great!

  2. #2
    Senior Member Deer Slayer's Avatar
    Join Date
    Jul 2013
    Location
    Advance, NC
    Posts
    971
    Quote Originally Posted by 98valk View Post
    Hey All,
    I don't know about you, but to me, that luggage rack is too low/too tight. It is tough to attach bungies to the underneath hooks, and stuff on the luggage rack likes to touch the paint (which is a big no-no).

    Here is a pretty easy way to raise it a bit. First, use the rear bolts and spacers on the front of the rack. That raises it about .6". Believe it or not, that makes a nice difference. You can try that without going any further and see it you like it.

    Next, get two 8 x 1.25 x 70mm bolts/screws. I went with some low profile panheads from Ace. Now, you need either a 1.8" spacer, or if you use the front spacers in addition, you only need a 1.25" spacer for the rear. I am using a 1/4" pipe, painted black, and cut to size.

    Not only is the extra room much more useful, but I think it actually looks better, too (less crowded). Of course, I am biased - all my ideas are great!
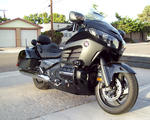
    Where in the photo?
    Deer Slayer
    If I can't fix it, I will fix it so no one can fix it.

  3. #3
    Senior Member
    Join Date
    May 2013
    Location
    Australia
    Posts
    185
    Great idea it would also make washing and polishing the bike a bit easier. Thanks for the tip.

  4. #4
    Senior Member 98valk's Avatar
    Join Date
    Jun 2013
    Location
    Albq, NM
    Posts
    790

    Raised the Rack Higher

    That ~.5" was good, but I wanted a bit more room.

    So, I took the rear spacer (1.15") and added it to the front spacer (I used jb weld, but you don't need to). So, the rack is now 1.15" higher.

    Then I got two 4" pieces of 3/8" galvanized pipe and cut both ends off. I ground and sanded until they were precisely 2.3" and square. Then painted them black.

    I think it looks good and I finally have the room to bungie things without rubbing on the paint.

    Excuse the dirt. I got caught in about 100 drops of rain; just enough to need washing.

    Oh yeah. You will need two 8 x 1.25 x 70mm bolts/screws for the front and two 8 x 1.25 x 80mm bolts/screws for the rear. I found them at Ace Hardware. They are not hard bolts, but I don't think the luggage rack will fall off.

    Attachment 5351

    Attachment 5352

    Attachment 5353

    Attachment 5354

Posting Permissions

  • You may not post new threads
  • You may not post replies
  • You may not post attachments
  • You may not edit your posts
  •